
This functionality really is the core capability of this Advanced Excel Contract Manager solution in Excel and as such, this is a bit of a monster post. To understand the concepts behind this separation model, you need only consider how a standard database works. The critical data is stored away safely in a set of tables in the database. A developer will then produce a front end presentation layer to allow users to interact with that data. If the solution is configured correctly, the modified data will only be written back to the tables in the database when the user means to and the data is properly validated. Than is what we will learn to do here, store the precious data on one worksheet, which should be locked and hidden from the users, and expose the data through a carefully designed form that makes the review and entry of the data much easier than a huge table.
Why do this…
A while ago I was working in an organisation that had a very extensive process optimisation programme of work, and my manager was tracking all the projects using a standard Excel table. He was lamenting that every time his boss opened the document, he would inadvertently delete, alter and otherwise corrupt the data. So I came up with the concept of separating the data entry from the data itself. By doing this, I can provide a view of the data, the user can interact with that data, but then has to make a conscious decision to write the data back to the master record. The other benefit of this model is that I can carry out validation of the data before it is written and even enforce particular fields to be populated.
The other challenge is that reading more than a few columns of data in an excel spreadsheet becomes quite difficult and it is often difficult to see interrelationships of the fields of data. By transposing the data into a format that resembles a data entry form, the information can be understood more quickly.
The concept
So the basic concept is to develop a method of finding a record in a table (and by record I mean a row of data), pick the individual fields out of that record and write them to a format that represents a form for easier viewing. There are two possible approaches available to achieve this; you can create a user form; or, you can use a spreadsheet formatted appropriately. Each option has its advantages and disadvantages:
User Form
Pro’s
- Easier to format and add new fields
- Greater control over the functionality of the fields and controls on the form
Con’s
- You need additional code to populate dropdown lists in combobox controls
- More difficult to make it look pretty and modern
- You need to write additional code if you want access to standard Excel functions in the fields
- Tends not to play well with screens of different sizes, a form that works great on a 20″ screen may be difficult to use on a 12″ laptop screen
Spreadsheet
Pro’s
- Full access to the power of Excel (charts, validation, formulas, etc.)
- Easy dropdown lists through validation tricks
- Easy to make it look pretty
- Tends to look better when you print the page as a report
Con’s
- Difficult to format and adding new fields can be challenging
- You can’t have multiple forms in view at the same time
Setting up the Excel sheet form
 So formatting the Excel sheet style form can be quite time-consuming. I’ve seen a lot of recommendations to steer clear of merge fields, but I don’t subscribe to this. The challenge with merged fields is that sometimes you have to reference the full range and other times you have to only reference the top left most cell inside the range. I don’t know when these two options apply, but if one doesn’t work, I do the other. In most cases I use Named Ranges anyway, which appears to alleviate the issue.
Make sure you set a Named Ranges for every field you are going to write to, it makes coding and debugging much more intuitive, and if you haven’t done so already, check out my blog on Contract fields and validation for ideas on how to supercharge your form.
Two special fields on the form are seen on the right below the arrows, they are the Mode and the Line fields.
The image of the form shows it in Edit Mode, this unlocks the fields for editing and I also change the backgrounds blue to highlight them and the mode. There are three modes for the form:
- View, which has a white background for the fields and allows the firm to be printed as a neat looking report. The fields are locked except for the Number field, which has a validated drop down to allow the user to select a contract to view.
- Edit Mode unlocks the cells except the Number cell, which is locked to prevent alteration of this key field. The background is set to blue for the editable fields to flag that cells can be changed
- Add Mode, largely the same as the Edit Mode
The difference between the Add and Edit modes is what happens when save record is clicked, but more about that later.
Setting up a user form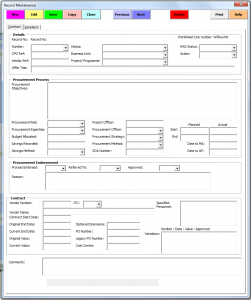
The User Form approach provides a lot more flexibility around the formatting and grouping of the controls, but it comes at a cost. Where setting up validation through drop down lists is a relatively straight forward process on the worksheet, in the User Form you need to write a piece of code to grab the values from somewhere and write them into the values list of the control.
'populate the numbers dropdown
    For Each celCell In wsR.Range("A2:A10000")
        If celCell.Value <> "" And Application.WorksheetFunction.CountIf(Range("A2:A" & celCell.Row), celCell.Value) < 2 Then
            With Me.cboNumber
                .AddItem celCell.Value
            End With
        End If
    Next celCell
The piece of code will walk through the contracts register and find all the unique values in the contracts register sheet and writes them to the combobox list. You will need a piece of code like this for every combobox, or hard code the values in where there is no need for the values to be adjustable. As you can imagine, initial setup of a form this complex is quite time-consuming, but adding more fields afterwards is comparatively simple. Adding a new field on the worksheet form above can take a lot of fiddling around to make room in the right place and still have it look good.
How to get the data
Regardless of the approach you choose in presenting the data, the basic functionality of finding the right record and extracting it is identical. There are many approaches, but here is one that I have found works well for me and provides a great deal of flexibility regarding the way the search for the right record functions. That approach is to step through the rows and test the field (or fields) to match a value. For example, every contract should have a unique identifier called something like a Contract Number, so that is a good field to start with.
Sub Find_Record()
    Dim lngRow as Long 'to step through rows during search
    dim strValue as String 'to hold the value we are searching for
    Dim wsD as Worksheet 'the data worksheet
    Dim wsRM as worksheet 'the record maintenance worksheet

    'Initialise our variables
    set wsD = Sheets("Data")
    set wsRM = Sheets("Record Maintenance")
    strValue = wsRM.Range("ContractNo").Value
    lngRow = 2 'start scanning from the row below the headers

    Call Set_Globals

    With wsD
        'Keep looking until we find the record
        While .Cells(lngRow,g_intNumber).value <> strValue
            If .Cells(lngRow,1).value = "" then Goto Not_Found
            lngRow = lngRow + 1 'move to the next row
        Wend
        'once we have found the record, we write the values
        wsRM.Range("RM_Title").Value = .Cells(lngRow, g_intTitle).Value
        wsRM.Range("RM_Description").Value = .Cells(lngRow, g_intDescription).Value
    end with

Exit_Sub:
    Exit Sub

NotFound:
    'If we get to the end of the list of records without finding a record, we need to let the user know
    MsgBox "No records were found for " & strValue, vbOKOnly, "Record Not Found"
    Goto Exit_Sub
End Sub
Lets walk through how this bit of code works, the aim is to simply step through each row of the contract register to find a matching record. The variables required for this are minimal, one to step us through the rows (lngRow), one to hold the value we are looking for (strValue) and a couple to hold the worksheets to save some typing, We work with two worksheets with this approach, the sheet that holds the data (wsD) and the sheet that has the report on it (wsRM).
You’ll note I have a statement of Call Set_Globals, this is a habit I picked up in the early days and I could probably replace it with other more up to date methods, but I like to set a bunch of global values that are quasi constants. I set worksheet variables (I added the setting of the worksheets in this code block for clarity), I set some constants and I identify the columns of my data with variables. Now I could achieve the last bit by converting the data set to a table and referencing the columns, but I’ll stick with this for now,
So we have our variables set, time to start stepping through our data to look for the value and I do this with the statement While .Cells(lngRow, 1).Value <> strValue. This uses the lngRow variable as the row component of the Cells property to allow me to step down one row at a time using lngRow = lngRow +1 at the end of the while loop. Each row it steps through, I carry out a test to assess if we have run off the end of the list of data using If .Cells(lngRow,1),Value = “”. The contracts number is a required field in my data, so there should always be one, if there isn’t’ then we have scanned all the data and not found what we were looking for. In this case, if I can’t find the value, I simply jump to the NotFound label and popup a message box letting the user know the value does not exist in the data set.
When the While statement validates as true because it has found a matching value, the code jumps out of the loop and lngRow is now set to the row the required data is held on. Now we just need to write each piece of data to the appropriate field on our form using wsRM.Range(“RM_Title”).Value = .Cells(lngRow, g_intTitle).Value. Note that I use a named range for the form field (RM_Title) and my global variable for the column of the data g_intTitle, this makes reading the code a little easier and tracking down misalignment’s much easier.
If you opt to go down the User Form path, this line is in fact the only difference in that you will need to write to controls on the form with something like frmRecordMaintenance.txtTitle.Value = .Cells(lngRow, g_intTitle).Value.
You will need a line like this for every field that you are writing to your form, I only have two to simplify the code, but in my real database there are 45 fields. This makes the sub oversized and I actually use this writing functionality in a few different ways, so this component has been moved to its own sub with the lngRow value being passed, something like Sub Write_Values(lngRow as Long). That way the search sub is simplified and the writing sub can be reused for other purposes, such as where the record is already displayed in a report.
The step through rows and test values approach also allows scope for more complex testing. In my register for example, I have contract, variation and work order records all in the one table, each type flagged with a Record Type of Contract, Variation or Work Order. I would only ever want to display Contract type records on this form, so my while statement like While .Cells(lngRow, g_intNumber)<> strValue AND While .Cells(lngRow, g_intRecordType)<> “Contract”, providing a double test to find the contract record, not any associated variations or work orders.
What about the work orders and variations
With the two different presentations option discussed above, I have a different method of displaying the variation and work order data, but because the data in in the same format and structure as the contract data, I find and extract the data using exactly the same approach. Writing the variation data to the worksheet type form is no different to the contract details, so I won’t go over that again. With the user form though, I wanted to provide list of associated work orders and variations on the front sheet while the detailed information would be on a separate tab on the form.
To display the list, I used a listbox and then concatenated the key fields before writing them to the list:
       'Now go get the variations
        lngRRow = 2
        intVarCount = 0
        Me.lstVariations.Clear
        With wsR
            While .Cells(lngRRow, 1).Value <> ""
                If ((.Cells(lngRRow, g_intR_Number).Value = strR_Number) And (.Cells(lngRRow, g_intR_Record_Type).Value <> "Contract")) Then
                    strVariation = .Cells(lngRRow, g_intR_Var_Number).Value
                    strVariation = strVariation & " : " & .Cells(lngRRow, g_intR_Var_Date).Value
                    strVariation = strVariation & " : " & Format(.Cells(lngRRow, g_intR_Var_Value).Value, "Currency") '$###,##0.00
                    strVariation = strVariation & " : " & .Cells(lngRRow, g_intR_Var_Sent).Value
                    Me.lstVariations.AddItem strVariation
                    intVarCount = intVarCount + 1
                End If
                lngRRow = lngRRow + 1
            Wend
        End With
Again you see in this example I’ve used the stepping through cells method to hunt down the values that, this time, are not equal to a record type of contract, and therefore picking up the variation and work order records. When a record is found, the values that we want are concatenated into a single string with colons between each value. In this case I use ContractNumber:VariationNumber:VariationDate:VariationValue. By doing this I display an overview in the listbox. This allows me to use a double-click event to strip the first two components of the contract and variation numbers to again search my register for the right record and then write the details to the variation tab of my form for detailed viewing.
Editing and saving the data
Now that we have our data displayed and locked safely from accidental modification, how doe we actually allow a user to intentionally modify and then save the date?
To highlight the fact that the fields have become editable, and to make data entry easier by clearly defining the field areas, not only do I unlock the fields, I also adjust the background and border colour.
Public Sub Toggle_Lock(boolLock As Boolean)

    Dim rngRange As Range
    Dim nmeName As Name

    With wsRM
'        .Activate
        .Unprotect
        'the ranges on the Record maintenance form use named ranges e.g. RM_Budget.
        'If there is a change to the form, makesure the named ranges are updated
        For Each nmeName In ActiveWorkbook.Names
            If (nmeName.Name Like "RM_*") Then
                'identify the named ranges that should never be unlocked
                If (nmeName.Name <> "RM_Numbers" _
                    And nmeName.Name <> "RM_Record_Type" _
                    And nmeName.Name <> "RM_Vendor_Num" _
                    And nmeName.Name <> "RM_Current_Value" _
                    And nmeName.Name <> "RM_Contract_Cur_End" _
                    And nmeName.Name <> "RM_Supplier_Details" _
                    And nmeName.Name <> "RM_Line" _
                    And nmeName.Name <> "RM_Var_First" _
                    And nmeName.Name <> "RM_Var_End_Dates" _
                    And nmeName.Name <> "RM_Var_All_Rows" _
                    And nmeName.Name <> "RM_Var_Range" _
                    And nmeName.Name <> "RM_Mode") Then

                    .Range(nmeName.Name).Select
                    With Selection
                        If (nmeName.Name = "RM_Number") Then
                            .Locked = Not boolLock
                        Else
                            .Locked = boolLock
                        End If

                        If boolLock = False Then
                            If (nmeName.Name <> "RM_Number") Then
                                Add_Border
                            End If
                        Else
                            Remove_Boarder
                        End If
                    End With
                End If
            End If
        Next nmeName
        .Protect
    End With

End Sub
Because I use Named Ranges to identify all my key fields, and this pays off in many ways through the development of a solution like this, I can simply step through the named fields to make sure I get them all by using the statement For Each nmeName in ActiveWorkbook.Names. Of course this will hit every name in the workbook, not just the ones on this worksheet, and this is where naming your named ranges carefully really helps out. Because I always put an identifier on the front of named ranges names to identify the sheet they refer to, I can simply look for that identifier to narrow the scope. This is the purpose of the If nmeName.Name Like “RM_*” Then. This will only pass the names I have on the Record Maintenance sheet through the next statement.
This is a bigger IF statement aimed at allowing me to keep certain fields locked all the time, these are fields that are either calculated by the solution and user should not interact with the result, or control fields for the functionality of the application. If the field name equals any of the listed values, it skips it and moves on to the next one.
If (nmeName.Name = "RM_Number") Then
    .Locked = Not boolLock
Else
    .Locked = boolLock
End If
The next bit of code is the core functionality of this sub, it either locks or unlocks the field. Note that boolLock is a value passed to the Sub, this allows this to be a toggle function. If the booLock value passed is True, then the fields get locked, if it is false, then the fields get unlocked. That is, with the exception of the Number field. When the sheet is in view mode and all fields are locked, the number field must be unlocked to allow the user to type in or select a number of the record to be displayed. However, when the sheet is in Edit or Add modes, the number must be locked to prevent the user altering this key field. As such, the If statement provides the ability to identify the number fields and reverse the lock status by putting Not in from of boolLock.
Our next little If statement checks if the field is locked, and if so, changes the border and shading by calling the Add_Boarder Sub that I have defined separately. Where the field is not locked, it calls the Remove_Boarder Sub that sets the border and background to white.
If boolLock = False Then
     If (nmeName.Name <> "RM_Number") Then
           Add_Boarder
     End If
Else
     Remove_Boarder
End If
Note again that the Number field is excluded from the format changes as we always want a white background and border on that field.
Writing the data back to the hidden register is a reversal of the population of the form. One very iportant shortcut to speed this process in the fact that we captured the row number that the record was on when we extracted the data. This means we don’t have to find the row again, we simply grab that value from the named range on the form.
'Get the row
lngRow = wsRM.Range("RM_Line").Value

'Write the changes to the register
'the ranges on the Record maintenance form use named ranges e.g. RM_Budget.
'If there is a change to the form, makesure the named ranges are updated
wsR.Cells(lngRow, g_intR_Record_Type).Value = .Range("RM_Record_Type").Value
wsR.Cells(lngRow, g_intR_Status).Value = .Range("RM_Status").Value
wsR.Cells(lngRow, g_intR_Action).Value = .Range("RM_Action").Value
wsR.Cells(lngRow, g_intR_RAG_Status).Value = .Range("RM_RAG_Status").Value
wsR.Cells(lngRow, g_intR_Offer_Title).Value = .Range("RM_Offer_Title").Value
wsR.Cells(lngRow, g_intR_Objectives).Value = .Range("RM_Objectives").Value
wsR.Cells(lngRow, g_intR_Business_Unit).Value = .Range("RM_Business_Unit").Value
wsR.Cells(lngRow, g_intR_Project).Value = .Range("RM_Project").Value
But before we save the data, we want to do some additional validation and one key challenge with any sort of data capture is getting users to fill in the required fields. “But how can you make an Excel cell mandatory” I hear you lament.This one another of the strengths of this model. An example is a simple Case Select statement driven by the current status of the contract management cycle.
'Check the minimum fields have been populated
        Select Case strStatus
            Case ""
                MsgBox "You must ensure the Contract Status field is set before saving the record.", vbOKOnly, "Missing Data"
                GoTo Exit_Save_Record
            Case "0. Planning"
                intCheck = 0
            Case "1. Requirements Building"
                intCheck = 1
            Case "2. RFx/ITO Issued"
                intCheck = 2
            Case "3. Exaluation"
                intCheck = 3
            Case "4. Draft Contract"
                intCheck = 4
            Case "5. Approval"
                intCheck = 5
            Case "6. Awaiting PO"
                intCheck = 6
            Case "8. Active Contract"
                intCheck = 7
            Case Else
                intCheck = 10
        End Select
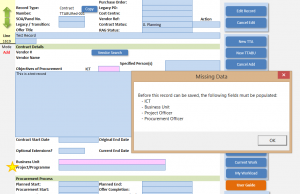
The Select Case statement allocates a value to the status that has been set against the contract record, we can then apply some logic to that value in further processing. Note that the first case is an empty string indicating that the user has forgotten to enter a status, this simply pop’s up a message box to remind the user and halts the save process. Where the user has entered a status, I developed a function that does three thing’s:
- It checks to see if there is data in the fields that are mandatory;
- It builds a message string to tell the user what data is missing; and,
- It highlights the fields with missing data.
There is some basic information that has to be entered every time no matter what the status of the process, such as the Title, Description, flags such as to whether this is an ICT procurement and what business unit is involved. So these are tested without qualification of the status. That testing is simple using a series of If statements.
If strOffer_Title = "" Then
    Data_Entered_Check = Data_Entered_Check & "   - Offer Title" & vbCrLf
    .Range("RM_Offer_Title").Select
    Call Format_Box
End If

If strObjectives = "" Then
    Data_Entered_Check = Data_Entered_Check & "   - Objectives of Procurement" & vbCrLf
    .Range("RM_Objectives").Select
    Call Format_Box
End If

If strICT = "" Then
    Data_Entered_Check = Data_Entered_Check & "   - ICT" & vbCrLf
    .Range("RM_ICT").Select
    Call Format_Box
End If

If strBusiness_Unit = "" Then
    Data_Entered_Check = Data_Entered_Check & "   - Business Unit" & vbCrLf
    .Range("RM_Business_Unit").Select
    Call Format_Box
End If
Note that what I am doing where a field fails its test is to add another line to the string I am using to build the message to the user, then I call a little code stub that formats the missing fields with a lovely pink background to help it standout and to direct the user to the fields they need to review. Once the basic tests are done, the remaining tests are wrapped in If statements that checks for the status of the process.
'For Active Contract
If (intCheck = 7 And intCheck < 9) Then
    If dteOffer_Complete < #1/1/1900# Then
        Data_Entered_Check = Data_Entered_Check & "   - Offer Completion" & vbCrLf
        .Range("RM_Offer_Complete").Select
        Call Format_Box
    End If

    If streTender = "" Then
        Data_Entered_Check = Data_Entered_Check & "   - Upload to eTender" & vbCrLf
        .Range("RM_eTender").Select
        Call Format_Box
    End If

    If strPO = "" Then
        Data_Entered_Check = Data_Entered_Check & "   - Purchase Order" & vbCrLf
        .Range("RM_PO").Select
        Call Format_Box
    End If
    'set the RAG to blank
    .Range("RM_RAG_Status").Value = ""
End If
Note that the beauty of assigning a numeric value to the status is that the tests are cumulative, a contract at its final stage of being Active must have all the fields filled in correctly. By assigning the highest number to Active and then using a test of intCheck > 2 for the planning checks, I will ensure the minimum fields for planing are checked for every process that is beyond planning.
Note also that I do other validation in some cases to make sure values entered are acceptable and even set some values, in this case the last two lines set the RAG status flag to blank as the client does not want RAG status on anything that is a completed process.
Now that we have build our error message string and highlighted the cells with missing or bad data, the final step is to tell the user where they messed up and give them a chance to fix it.
strMsg = Data_Entered_Check(intCheck)

If strMsg <> "" Then
    MsgBox "Before this record can be saved, the following fields must be populated:" & vbCrLf & strMsg, vbOKOnly, "Missing Data"
    Save_Record_Data = False
    Exit Function
End If
the result looks like this.
I told you this was going to be a monster post, this just brushes the surface of what is possible and the full functionality in this part of the workbook.
I the next post I’ll look at how we can generate unique identifier numbers for each new process and contract.