
Two terms you may come across when dealing with data analysis are data source and data provider. A data source is where the data comes from and a data provider is a solution that maps the fields of the data source and puts it into a format that can be used for analysis and reporting. Transforming data from a source into a format that can be used as a provider can be challenging and often requires expensive and complex middle wear applications. In this case, part of the challenge was that 1) a long term solution is on the way, but probably 12 months away from final delivery; and 2) the data had to be passed to regional offices for them to assess their data and be able to cross compare to other regions where necessary.
Microsoft Access and Excel provide excellent quick development and easy deployment capabilities and licensing existed for both, but Access was discounted as staff are not familiar with its functionality and the IT team baulk as deployment of Access databases. So an Excel solution was selected.
Transforming from source to provider
Ok, so what is the key difference between a data source and a data provider?
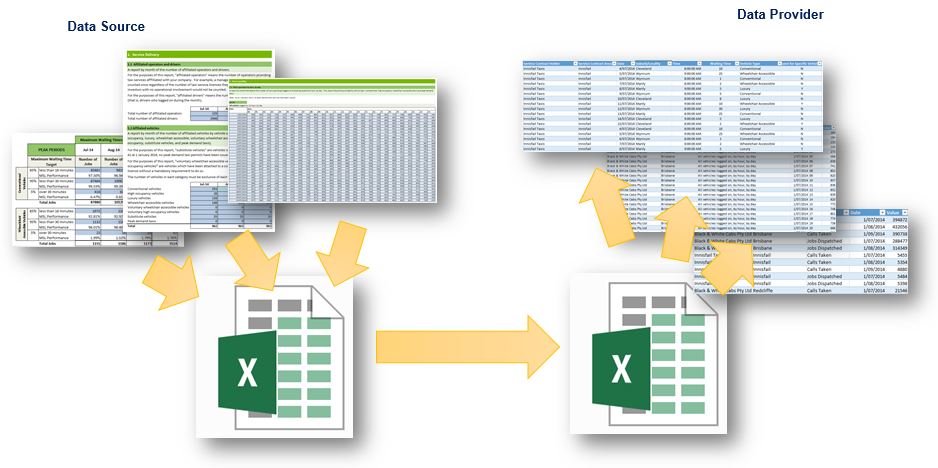
In this case, the data source was a series of different tables in a workbook. The table format is great for doing data entry, but how can we report against one provider, let alone twenty. The first step is to recognise that each value in the table is a data point that requires a set of parameters to identify it.
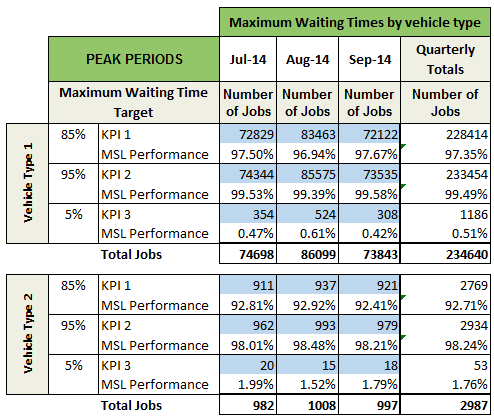
In the example above, consider the value of “72829”. In this format we know who it relates to as it is in the workbook from Vendor A. We know the type of vehicle, the period, the date and the KPI it relates to, but take that one value and put it in a table with a bunch of other values, then mix that with values from other vendors, and you will quickly lose visibility of what that value actually means. What we need to do is transform the data from this data entry format and put it into a tabular format.

So if we look at the tabular format, we can see we have our values on the far right, but now, with each value we have all the information that defines that value. The vendor, the area, the period, scope and KPI. Once the data is in this format, we can happily mix it with data from other vendors and we have full flexibility to build pivot tables, use formulas and any other Excel functionality we choose the really dig in and understand the data.
First we find the workbooks
The format and structure of the the workbooks sent out was fully locked down, which makes life a lot easier when you need to import data. The one thing that is variable and out of our control, is the naming of the workbooks. So I had to build some flexibility into this part of the solution. I also wanted to give the business the flexibility to import from what ever folder they choose.
This is achieved with two separate pieces of functionality. the first to choose the folder, the second to get the files from the folder. To choose the folder, I used the file picker function.
Application.FileDialog(msoFileDialogFilePicker)This is a little odd given that we are in fact only selecting a directory and as such could have used the “msoFileDialogFolderPicker” option, but early testing with the users indicated that they preferred to be able to see the files that are in the folder, which is not possible with the folder picker version.
When the user selects a file through the dialogue, I simply strip the file name from the full path.
intChar = InStrRev(strFilePath, "")
strPath = Left(strFilePath, intChar)
The InStrRev function looks for a given character, in this case the backslash, from the right hand end of the string and returns it’s position in the string as a numeric value. A trap for the unwary here is that despite the fact that it searches from the right, it gives the displacement from the left. For example, in the string “FolderFile”, even though the function would start looking from the “e” at the right side of the string and scan left until it found the “”, it would return the value of 7 as it is seven characters from the left. This one has caught me out on more than one occasion.
I captured the position of the backslash in the variable intChar and then used that in the Left function to strip off everything past the last backslash, which is the file name.
I then write the value to the main worksheet for the importing process so we can recall it and use it as desired. I also write a hyperlink so the user can quickly access the directory to add files or just to check them.
'write the file path to the reports sheet
With Worksheets("Reports")
   .Range("R_Path").Value = strPath
   .Hyperlinks.Add Anchor:=Range("R_Path"), Address:=strPath, SubAddress:="", TextToDisplay:=strPath
End With
The next bit of functionality is to find those workbooks in the director, and I did a couple of extra value adds with this.
I used the Dir function to get the file names, then I wrote the file names to the main worksheet for two reasons. One is to allow the user to confirm that we are seeing all the files in the directory, the second is that I added a cell next to each file name with a validation drop down that allows them to select if the workbook should be imported.
Sub Write_File_Names(strPath As String)
    Dim strFile As String
    Dim intRow As Integer

    'load the files from the import directory
    strFile = Dir(strPath & "*.xl*")
    With Sheets("Reports")
        .Unprotect Password:=g_strPWD
        'set the first validation option to Yes
        .Range("F30").Value = "Yes"
         'then delete all the other lines to clean things up
        .Range("B31:F100").Delete Shift:=xlUp

       'Set the first row for writing the names
        intRow = 30

       'While we keep finding files in the directory
        Do While strFile <> ""
            'write the file name
            .Cells(intRow, 2).Value = strFile
            'and copy down the validation
            .Cells(30, 6).Select
            Selection.Copy
            .Cells(intRow, 6).Select
            ActiveSheet.Paste

            intRow = intRow + 1
        ' Use Dir to get the next file name.
            strFile = Dir()
        Loop
        .Protect Password:=g_strPWD
    End With
End Sub
So now we know where to find the files and which files we want to import.
Opening the Workbook
The getting of data involves the use of several nested loops:
Loop through all workbooks
Loop through all worksheets
Loop through each data field
Looping through the workbooks uses the same code as described earlier for getting the file names. This time though there are a couple of extra steps.
First we check if the workbook should be included in the import process, based on the validation selector next to the file name on the main sheet. If we don’t want to include it, I used a GoTo function to jump to the next worksheet. Because we don’t know where to find the file name in the list, the test for whether to include the workbook requires a loop through the list to find the workbook name and then check if the validation selector is set to Yes or No. It then passes the result back as a Boolean true or false.
'check if this workbook should be included in the import
If Include_Import(m_wbDBWorkBk, m_strFile) = False Then
     'if not, go to the next workbook
      GoTo Next_Workbook
End If

Function Include_Import(wsD As Workbook, strWS As String) As Boolean
    'This function checks the lis to determine if the workbook should be included
    Dim intRow As Integer

    intRow = 7
    Include_Import = False

    With wsD.Sheets("Reports")
        'check if the workbook should be imported
        intRow = 30
        While .Cells(intRow, 2).Value <> ""
            'scan the list to find the right company and are combination
            If (.Cells(intRow, 2).Value = strWS) Then
               'then check if it should be imported
               If .Cells(intRow, 6).Value = "Yes" Then
                    Include_Import = True
                    Exit Function
                Else
                    Include_Import = False
                    Exit Function
               End If
            End If
            intRow = intRow + 1
        Wend
    End With
End Function
Next we need to check if the workbook is in fact a valid workbook. There is potential for a vendor to send in the incorrect workbook, so rather than have the user open and check every workbook, the code does it for them. This is done simply by checking for information that should be in a specific place if the workbook is correct. In this case I used the company, area and From Date information that should appear on the Front Sheet of the imported workbook.
'Get the company and area info
 m_strCompany = m_wbImpWorkBk.Worksheets("Front Page").Range("D7")
 m_strArea = m_wbImpWorkBk.Worksheets("Front Page").Range("D9")
 m_dteStartDate = m_wbImpWorkBk.Worksheets("Front Page").Range("E13")

 'check if we can find the right information on the front Page sheet
 If m_strCompany = "" And m_strArea = "" And m_dteStartDate = #1/1/1900# Then
  'If we can't, it is possible that the import worbook is not the right template
        varResponse = MsgBox("The import workbook " & m_wbImpWorkBk.Name & " does not appear to be the right template." & vbCrLf & vbCrLf & _
         "Do you want to skip this workbook?", vbYesNo, "Incorrect Format")
          If varResponse = vbYes Then
                GoTo Next_Workbook
          End If
  End If
The code does give the end user the option to continue with the import, but it is likely to fail anyway. It is possible that one piece of information is missing, so this gives the user the chance to check the workbook, fix the missing data and continue with the import.
Then we need to assess if the workbook has already been imported. This is achieved by comparing the company name, area and the from date to information that is already recorded in the destination workbook.
'Check if this workbook has already been imported
boolAlreadyImported = Check_If_Already_Imported(m_strCompany, m_strArea, m_wbDBWorkBk, m_dteStartDate)
         If (boolAlreadyImported = True) Then
                varResponse = MsgBox("Workbook " & m_wbImpWorkBk.Name & " for " & m_strCompany & " covering period from " & m_dteStartDate & " appears to have already been imported." & vbCrLf & vbCrLf & _
      "Do you want to overwrite the data for this workbook?", vbYesNo, "Duplicate Import")
      If varResponse = vbYes Then
            Call Delete_Old_Data
      Else
            GoTo Next_Workbook
      End If
End If
Where it is found that the workbook has been imported already, the user is given the option to either skip this workbook and move on to the next one, or to overwrite the old data. This is achieved by finding all records in the destination workbook that align with this workbook to be imported and deleting it before then importing the new data.
Working through the worksheets
Now we have a workbook open, we’ve confirmed it is the right format, we want to include it and either we haven’t imported it before or we want to overwrite the old date. Next we have to work our way through the worksheets and import the data.
The basic line of code is simple, using a For Each loop to step through each worksheet in the source workbook. I also named the destination worksheets in the data provider workbook the same to simplify matching the source to the destination.
For Each m_SummarySheet In .WorksheetsThe data source workbooks contain 21 worksheets and we only want to import data from 17 of them, and each worksheet for collecting the data is a different format, so it is necessary to identify the worksheet and select the appropriate method of importing the data. Since our data collection workbook provides a controlled environment where we know the names of all the worksheets, I simply used a Select Case model
 'find the right import process for each worksheet
 Select Case m_strWorksheet
     Case "Worksheet Name 1"
          'check if we should import it
          If .Worksheets("Reports").Cells(7, g_intSD).Value = "No" Then GoTo Next_Worksheet
          ' Set a variable to the sheet you want to read the data from.
          Set m_SourceSheet = m_wbImpWorkBk.Worksheets(m_strWorksheet)
          Call Get_Worksheet Name_1

     Case "Worksheet Name 2"
          'check if we should import it
          If .Worksheets("Reports").Cells(7, g_intFC1).Value = "No" Then GoTo Next_Worksheet
          ' Set a variable to the sheet you want to read the data from.
          Set m_SourceSheet = m_wbImpWorkBk.Worksheets(m_strWorksheet)
          Call Get_Worksheet Name_2
There are a couple of thing’s going on in this code. 1) Clearly the Select Case is identifying the name of the worksheet and passing the matching ones through to the code for the right Case. 2) the first thing that is done after that is a check to see if the worksheet should be included, this functions in the same way as the inclusion or exclusion of the workbook, but in this case I know where the value will be stored, so it is a direct reference with Cells”(7, g_intSD)” with no need for a loop to find it. 3) Once we ascertain that the worksheet should be included, we set a module variable to track the worksheet name for further processing, then 4) we pass it off to the appropriate import sub routine.
Getting the Data
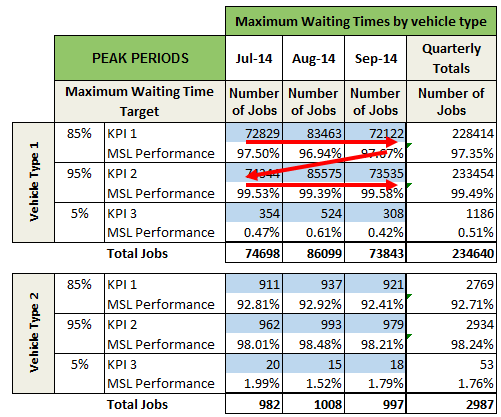
This is where the bulk of the effort went in, each worksheet is in a different format, so an import routine had to be written for each one. The basic functionality is that each data point must be stepped through sequentially.
The basic code for doing something like that is something like:
For m_lngSRow = 9 To 10 Step 1
        For m_intSCol = 3 To 5 Step 1
               <<get data here>>
        Next m_intSCol
Next m_lngSRow
You’ll note there is a double loop here, one looping through the rows using the m_lngSRow variable, the other stepping through the columns using the “m_intSCol” variable. Each steps one row or column after each loop and it fits a nice tabular structure such as the one we are trying to create. But note in the example source data provided, there are two row gaps between each row of data values and then a four row gap when we jump to the next set of data for Vehicle Type 2. To compensate for this, I took a rather inelegant, but effective path, I employed an If statement to test the values of the 3rd column and the data point itself.
If IsNumeric(m_SourceSheet.Cells(m_lngSRow, m_intSCol).Value) And m_SourceSheet.Cells(m_lngSRow, 4).Value Like "KPI*"By doing this, I can step through every row, but only capture the values I actually want. Column 4 must have the character string “KPI” in it and the value must be numeric before the IF statement will parse as true.
As I said, there are seventeen different worksheets to be imported and seventeen different formats. So there are seventeen different import models overcoming different challenges in the data structure. Some used row number identification to cause the row to jump to the next data set such as “IF m_lngSRow = 23 Then m_lngSRow = 27”. Others lent themselves to simple patterns, each had to be considered, defined and adjusted until the desirable outcome was achieved.
Writing the data provider format
The metadata surrounding each data point comes from different places. Some remain the same throughout the workbook, such as the company name, area and start date that come from the Front Page of the source workbooks. The rest of the metadata is unique for each worksheet data set. Capturing this data was another good challenge in managing the setting of variable values. Consider the example we have used so far.

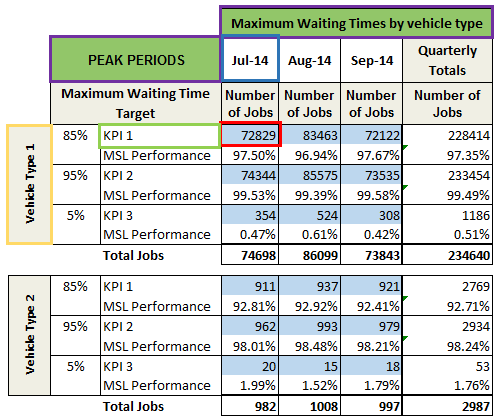
In this case we have the data point outlined in red and all the metadata (excluding company, area and from date) outlined in different colours for illustration. The Green outlined item changed when the data point row changed while the blue outlined item changed when the data point column changed. The orange item had to change each time the import moved to the next sub-table and the purple items only changed when the import moved to new major sections of the sub-tables.
Once the data points and metadata is captured, writing the actual data is straight forward.
For m_lngSRow = 18 To m_lngLastRow Step 1
            m_SummarySheet.Cells(m_lngDRow, 1).Value = m_strCompany
            m_SummarySheet.Cells(m_lngDRow, 2).Value = m_strArea
            m_SummarySheet.Cells(m_lngDRow, 3).Value = m_dteStartDate
            m_SummarySheet.Cells(m_lngDRow, 4).Value = m_SourceSheet.Cells(m_lngSRow, 2).Value
            m_SummarySheet.Cells(m_lngDRow, 5).Value = m_SourceSheet.Cells(m_lngSRow, 3).Value
            m_SummarySheet.Cells(m_lngDRow, 6).Value = m_SourceSheet.Cells(m_lngSRow, 4).Value
            m_SummarySheet.Cells(m_lngDRow, 7).Value = m_SourceSheet.Cells(m_lngSRow, 5).Value
            m_SummarySheet.Cells(m_lngDRow, 8).Value = m_SourceSheet.Cells(m_lngSRow, 6).Value
            m_SummarySheet.Cells(m_lngDRow, 9).Value = m_SourceSheet.Cells(m_lngSRow, 7).Value
            'test if any cells are empty
            Set m_rngRange = m_SummarySheet.Range("A" & m_lngDRow & ":H" & m_lngDRow)
            For Each m_clX In m_rngRange
                If IsEmpty(m_clX.Value) Then g_boolIncomplete = True
            Next m_clX
            m_lngDRow = m_lngDRow + 1
    Next m_lngSRow
Note here as we loop through the rows of data points, we write the values to the destination sheet. In some cases writing the value of variables such as “m_SummarySheet.Cells(m_lngDRow, 1).Value = m_strCompany”, in other cases copying the value directly from the source sheet to the destination sheet “m_SummarySheet.Cells(m_lngDRow, 8).Value = m_SourceSheet.Cells(m_lngSRow, 6).Value”.
Note also that the process carries out two tests during the import. The first is to walk through each line after import and check if there is data missing, if there is it sets a Boolean flag for incomplete data.
For Each m_clX In m_rngRange
       If IsEmpty(m_clX.Value) Then g_boolIncomplete = True
Next m_clX
The other test (not shown in the code snippet) is simply to assess if the record count has gone up, if it hasn’t then there was no data imported and a flag is set to indicate there were no records.
If m_lngDRow = m_lngNoRecordCount Then g_boolNoRecords = TrueThese two flags are used when the import report is written to indicate if a worksheet was in complete or data was missing altogether. This significantly cuts down on the review time for the user as they don’t have to check every worksheet in every workbook.
What is the benefit?
Why take the time to build something like this, and it does take quite a bit of time I assure you. Well there are a few benefits.
- The most immediate is that this solution can import, reformat and check every data point in less than an hour. It takes that long because one worksheet alone has over 11,000 data points, without including that sheet, the rest of the sheets import in just 4 minutes.
- The quality of data will benefit through this more thorough testing. to ensure there isn’t any missing data.
- Prior to implementing this solution, only two reports were generated out of the data and it required hours of work to open each workbook, copy specific data points into another workbook then copy the result to a Word document then save the report in PDF format before reporting. The solution can now complete that same cycle, producing four reports, in 12 seconds and there is no risk or data entry error.
- Most of the data provided was never reported on as it was inaccessible, moving the data into a data provider format now makes the reporting easy and limitless.
While this type of work is not the core business of PME4U, the use of Office automation techniques has allowed us to provide our clients with robust and effective solutions to their data capture, management and analysis challenges and it is a key aspect of being effective in developing procurement strategies and tactical implementation.
For more information, feel free to leave a comment below, join our forums or contact us directly via the Contact PME4U web page.